MCP 可以说是个炙手可热的话题。想必大多数人都已在铺天盖地的宣传介绍中对它有所耳闻。不过,网上大部分的使用介绍要么是基于 Mac 系统,要么是基于 WSL 环境,对于 Windows 用户来说,难免有些不便。所以今天就专门针对 Windows 系统用户的使用场景,给大家详细记录和分享一下 Figma MCP 相关的操作过程,希望能为大家提供一些参考与帮助。
Cursor Talk to Figma MCP 简介
Cursor Talk to Figma MCP 实现了 Cursor AI 和 Figma 之间的模型上下文协议(Model Context Protocol,MCP)集成,允许 Cursor 与 Figma 进行通信,以读取设计内容并以编程方式对其进行修改。
Github 地址:https://github.com/sonnylazuard
一、配置克隆项目
# 克隆项目
git clone https://github.com/sonnylazuardi/cursor-talk-to-figma-mcp.git
# 进入项目目录
cd cursor-talk-to-figma-mcp
# 使用Cursor打开项目
cursor .
二、安装 Bun
如果使用的 mac 或者安装了 WSL 的可以继续以下命令
# 安装Bun运行环境
curl -fsSL https://bun.sh/install | bash
# 配置项目环境
bun setup
# 启动WebSocket服务
bun start
windows 解决方案
考虑到有部分人使用的是 windows 系统,所以整理了 windows 的命令。
- 使用 PowerShell 替代方案
# 这是 Bun 官方提供的 PowerShell 安装方式(`irm` 是 `Invoke-RestMethod` 的别名,`iex` 是 `Invoke-Expression` 的别名)。
irm https://bun.sh/install | iex
- 手动安装(推荐)
powershell 下载安装脚本:
curl -o install.sh https://bun.sh/install
在 WSL 或 Git Bash 中执行该脚本:
bash install.sh
执行完成后,Bun 已经成功安装到 ~/.bun/bin/bun,但系统无法找到 bun 命令。这是因为你需要将 Bun 的安装路径添加到 shell 的环境变量中,接下来我们来修改系统环境变量
-
以管理员身份运行 PowerShell: 右键点击 PowerShell 图标,选择 "以管理员身份运行"。
-
添加系统环境变量:
# 添加 BUN_INSTALL 环境变量 [Environment]::SetEnvironmentVariable( "BUN_INSTALL", "$env:USERPROFILE\.bun", [EnvironmentVariableTarget]::Machine ) # 将 Bun 路径添加到系统 PATH $currentPath = [Environment]::GetEnvironmentVariable("PATH", [EnvironmentVariableTarget]::Machine) $newPath = "$env:USERPROFILE\.bun\bin;$currentPath" [Environment]::SetEnvironmentVariable("PATH", $newPath, [EnvironmentVariableTarget]::Machine) -
验证配置: 关闭并重新打开 PowerShell 窗口,然后运行:
# 检查环境变量是否正确设置
$env:BUN_INSTALL

# 验证 bun 命令
bun --version
可以正常打印版本号即为成功
 接下来启动服务即可
三、初始化项目
# 配置项目环境
# 该命令会在当前项目根目录创建一个 .cursor/mcp.json文件,这是Cursor MCP服务的配置文件
bun setup
# 启动WebSocket服务
bun socket
输出以下提示表示服务启动成功
 如果是 windows 用户,配置这一步会提示

所以,让我们来解决他!
windows 解决方案
首先找到项目的配置文件 package.json
 然后将"setup" 配置项改为
"setup": "node -e \"const os = require('os'); const { execSync } = require('child_process'); if (os.platform() === 'win32') { execSync('powershell -ExecutionPolicy Bypass -File ./scripts/setup.ps1', { stdio: 'inherit' }); } else { execSync('./scripts/setup.sh', { stdio: 'inherit' }); }\"",
再在 script 下新增 setup.ps1 文件
内容如下
# PowerShell setup script for Windows

# Create .cursor directory if it doesn't exist
if (-not (Test-Path ".cursor")) {
    New-Item -ItemType Directory -Path ".cursor" -Force
}

# Install dependencies using bun
bun install

# Create mcp.json with the current directory path
$mcpConfig = @"
{
  "mcpServers": {
    "TalkToFigma": {
      "command": "bunx",
      "args": [
        "cursor-talk-to-figma-mcp@latest"
      ]
    }
  }
}
"@

$mcpConfig | Out-File -FilePath ".cursor/mcp.json" -Encoding UTF8

Write-Host "Setup completed successfully!" -ForegroundColor Green
之后我们再去 PowerShell 中执行命令即可
bun setup
bun socket
四、Figma 插件配置
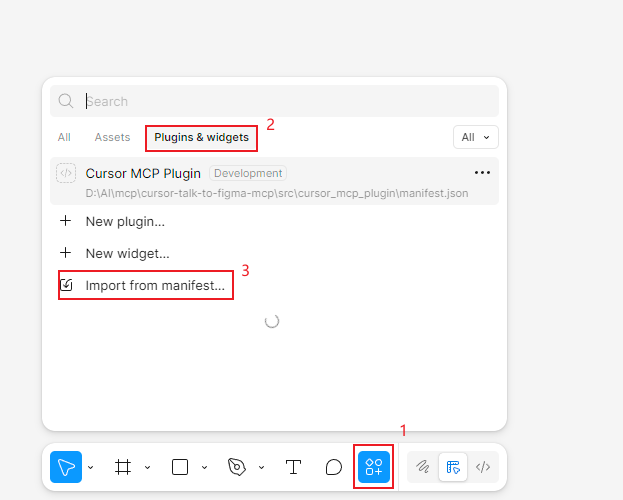
1、在 Figma 中新建一个Drafts 文件
2、打开Plugins & widgets菜单
3、选择import from manifest选项
4、导入项目目录\src\cursor_mcp_plugin 下的manifest.json文件

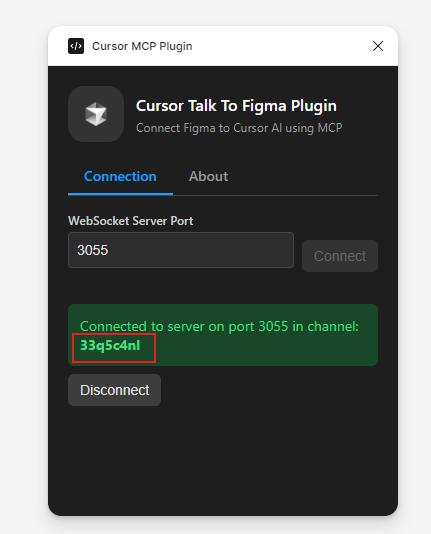
5、运行并记录 Channel 编码

五、cursor 使用
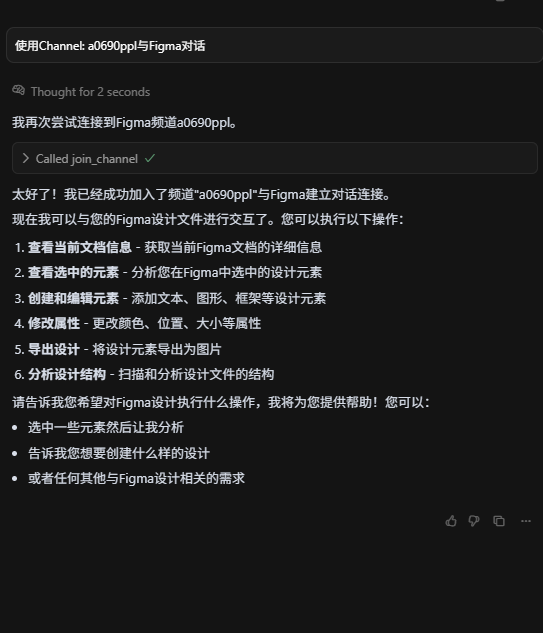
Figma 服务建立连接
使用channel: 33q5c4nl 连接服务和Figma进行对话

至此,我们的配置操作已经完成,开动你的想象力放手去干吧,接下来就是 Cursor 的表演时间!
凡是过往,皆为序章!


Hi, roeddwn i eisiau gwybod eich pris.